Pupil Lists
Pupils > Pupil List is a highly versatile tool for getting a list of specific pupils with relevant data.
As with any screen on Pupil Asset, use your Filters in the top-left to filter to the pupils you want to display.
NB: Remember the year filter. If you’re filtering to Year 6 and select a mixed-year class from Pupil Info you will only get pupils in that class who are Year 6. (Filtering to Whole School will rectify this.)
Once you have filtered to the pupils you want to see, you can select the data you want to see for them. This is controlled by Choose Columns.
Manually ticking fields on and off will update your list. You can also click *Show all options* to get a full screen of options you can select. Click Choose these columns at the bottom left-hand side of this screen to add the chosen columns.
Once you’re happy with your pupil list, you can click the print symbol on the red bar in the top-right of your screen. You can also use the download symbol if you want to download as a word document or spreadsheet, for example.
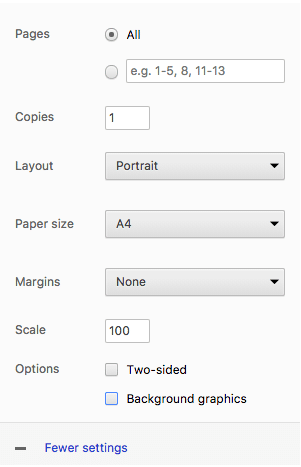
Before printing, make sure you’re happy with the print preview in your browser. You may need to change the layout to landscape to fit on your page. More settings will also let you set the Margins and Scale to control how the list looks on the page.
NB: Scale is out of 100% so setting to 90% will squeeze more data in. Margins can be set to None to also make more room.
Save paper! Try changing the printer you have selected to ‘ Save as PDF’ to create a digital copy you can email and share.
Labels
You can create labels for pupils or staff.
Navigate to Office > Reports > Pupil Labels or Staff Labels, depending on your need, the functionality is the same for both.
As with the Pupil List, your Filters control which pupils will appear on your labels; filter by year, class, or other demographic data to change the pupils you have selected.
Then, go to your Display Options to select how the labels will print.
Your Label Sheet Size controls the format on the screen. Set this to match the number of rows and columns on your printable labels.
Fields To Display controls the data that will appear on your labels. You may want to set the first row to Free Text Field and type ‘Parent or carer of:’ and the second row to Pupil Name. Rows can be set to blank by selecting Free Text Field and leaving the text box empty.
You can also set specific rows as bold and set the alignment of the text on the label.
Click Refresh to add your settings to the labels.
You can also save your labels as an office report if you will be printing them again later, just click Refresh + Save as Office Report.
Once you’re happy with your labels, click the white button saying ‘Print’ to generate reports (the usual print logo on the red bar will not carry over the correct formatting).
As with printing Pupil List, change your Margins and Scale to ensure the report prints correctly on your labels.
NB: Margins = None and Scale = 100 is a good start, but different printers and labels will format differently so be sure to try a few single page test runs before running for the whole school!
If you wish to create labels using a Microsoft Mail Merge, see ‘How to create labels using Microsoft Mail Merge‘.
Herringbones
Registration certificates or ‘herringbones‘ can be printed individually from a pupil’s Attendance tab.
To print for multiple pupils at once, go to Office > Office Reports & Print-Outs > Saved Reports.
Open the folders on the left to Office Reports > Pupil*Asset Standard Reports > Registration Certificates and then click Go to Multi-Print.
Again, make sure you have the correct pupils selected by using your Filter Block.
Use Display Options to control the range of dates you want to report attendance for (hit Refresh to make sure this updates).
Finally, click the white button that says Print full report -> to generate your reports and then use the print settings as detailed above.
Data Collection Sheets
There are a number of other reports you can run in Office > Office Reports & Print-Outs > Multi-Print, but one of the most commonly requested is the Data Collection Sheet.
Go to Office > Office Reports & Print-Outs > Multi-Print and click Display Options to select a report Template.
There is a number to choose from here, including two different Data Collection formats (including blank versions).
Select one and click Refresh to see how the reports look. It’s entirely up to you which report you use.
Remember, your Filters control which pupils you are going to generate reports for.
Once you have the pupils and template you want to be selected, click Print -> to generate reports.